When working in the negative space and painting a background in around a foreground element that you want to keep clean, you might look at all the tight corners and crevices and think that the only possible way to accomplish the task would be with masking fluid. Not so - I rarely use masking fluid these days. I find that painting around is much faster and effective, and I feel that the various aspects of a piece are better integrated if I can avoid masking fluid's hard edges.
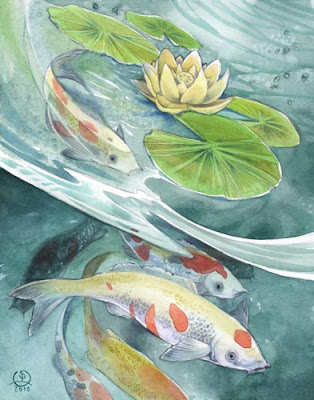
For this piece, in the initial stages, I painted around all the fish. I wanted the water to be smooth and blended, but not to interfere with the bright oranges and whites of the koi.
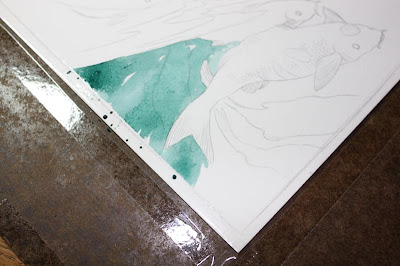
Started by using a round brush to lay in some greens quickly, starting from one corner where I do want a hard edge (the lower surface of the water). Work quickly, making sure the paint stays wet. It's not such a large area that this is difficult though. Starting in small tight corners is easiest.
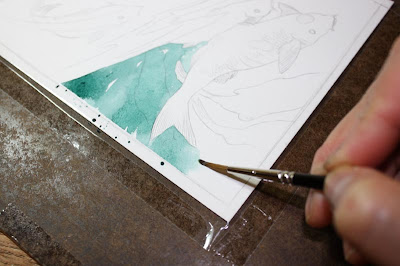
The lower left area near the fish's tail is where I'm continuing the greens. Making sure that lower edge stays wet, I dilute the paint on my brush a bit, and then start to pull that wet edge downwards and around into the next chunk of background.
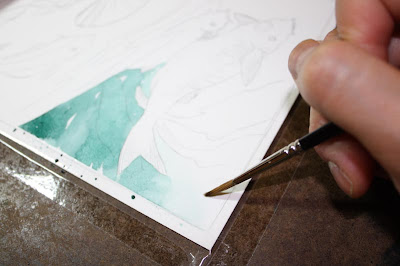
Dilute some more, and continue pulling that lower wet edge downwards until it fades into the white of the paper.
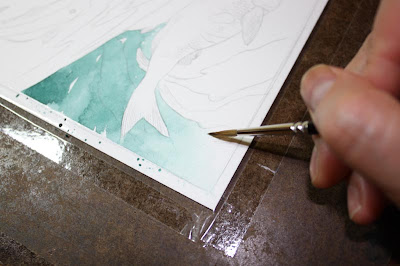 Once this layer dries completely, I can repeat this process, starting in a new corner and pulling the edges of the wet paint out to blend into the surroundings. As long as the edge always blends to clear, you can layer small sections of washes like this, and have a (mostly) seamless background.
For this piece, in the initial stages, I painted around all the fish. I wanted the water to be smooth and blended, but not to interfere with the bright oranges and whites of the koi.

Started by using a round brush to lay in some greens quickly, starting from one corner where I do want a hard edge (the lower surface of the water). Work quickly, making sure the paint stays wet. It's not such a large area that this is difficult though. Starting in small tight corners is easiest.

The lower left area near the fish's tail is where I'm continuing the greens. Making sure that lower edge stays wet, I dilute the paint on my brush a bit, and then start to pull that wet edge downwards and around into the next chunk of background.

Dilute some more, and continue pulling that lower wet edge downwards until it fades into the white of the paper.

 Once this layer dries completely, I can repeat this process, starting in a new corner and pulling the edges of the wet paint out to blend into the surroundings. As long as the edge always blends to clear, you can layer small sections of washes like this, and have a (mostly) seamless background.
Thank you for posting this! I've been wondering how you get away with not using masking fluid. :)
ReplyDeleteAnd can I just say that those fish, the colours, everything, are gorgeous!
You're welcome Cait!
ReplyDeleteThank you very much for this quick walk through and explanation! Keeping clean, but not harsh, edges while still attempting to have "blendy" watercolors has been something I've been having trouble with since I started experimenting with the medium this year.
ReplyDeleteThanks,
Kit
Thank you for this! Your painting is gorgeous as always.
ReplyDeleteMy problem with blending to white is that it looks fine when still wet, then when it dries... a harsh edge appears. It's like paper white -> color edge -> white. Argh! I'm probably still doing something wrong.
A completely unrelated question - what kind of tape do you use for fixing the paper to the drawing board? I've tried so many types but they always stick to the paper so much that they tear off a bit of the surface when removing them...
Thanks a lot for sharing this. :)
ReplyDeleteZsu - It's just some unbranded tape, so I'm not sure.
ReplyDeleteAs for the edge appearing when it dries, try dabbing a paper towel along the "clear" edge of water, so that the moisture also kinda gradates if that makes any sense.
I just wanted to tell you Stephanie that I just received both of your tutorial books and they are astounding! I'm learning watercolor as a 'recovery medium' from earning my BA degree in glassblowing. Very different from working 'hot and fast' to slow layering.
ReplyDeleteI especially love the examples of sketching figures and the way you ordered the the details. Your books are definite references for the years to come! Thank you for creating them!
You're very welcome! I'm happy to hear the books are proving to be so useful for you. Glassblowing is something I'd love to try someday, though the kilns scare me a bit!
ReplyDeleteJust to ask... Do you review old work or already used stories to improve them? I mean... mm... is always new story in every picture and never come back or several variations can be?
ReplyDeleteMarina - Sometimes! With some of my favorite stories, I do come back to them periodically with a new approach.
ReplyDeleteThank for this tip of background technique. We had taken a Mermaid painting class from you at the Art Expo on 2009 in Pasadena. I had just bought your book for that from Barns and Noble Book Store. I see your publisher printed your new book. Congratulations.
ReplyDeleteThank you! And yes, they have since printed 3 new books. :)
ReplyDelete