Unhelpful as that sounds, it does eventually come to that. But having some basic understanding of how to construct a very simple design, and the underlying patterns to create the weave are a necessary starting point. With enough practice from there, you do just start to feel it, and it becomes less of a technical nightmare.
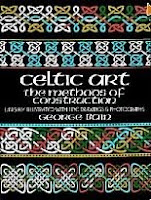 Artist Cari Buziak has several free tutorials to get you started on knotwork, and the book that I learned from and found to be the most helpful was Celtic Art: the Methods of Construction, by George Bain.
However, the method of instruction he uses is very compact and concise, and might be confusing to some people, though it worked quite well for me. He does cover all types of designs, including knotwork, spirals, key patterns, and anthropomorphics.
* * *
 Initial Concept
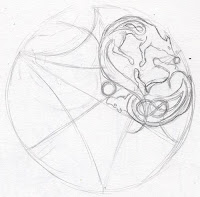
This particular commission was for a circular knotwork piece incorporating coyote(s) and bear(s), so I start with sketching out some guidelines. The circle itself, as well as separating it off into segments.
With the two animals to work in, I can either choose to create a non-symmetrical design, or else portion off the circle and create a repeating pattern. I chose to the do the latter for this, and divided the circle up into thirds (with a subdivide in each segment so that half is the coyote, half is the bear).
I then can roughly sketch in how the animals will fit into the design. You can see how I pull the coyote's tail down into the adjacent segment -- eventually it goes much further than that even, but this helps to tie the whole design together so that it's not just 3 big pie slices in their separate containers, but a melded whole.
* * *
 Scanning and Propigating the Pattern
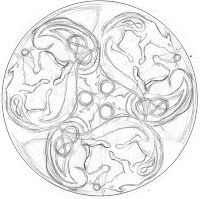
Here's where the joys of the digital age kick in. Once I have the basic structure in mind for one segment of the pie, I scan it in.
Digitally, I take that segment and rotate it 120 degrees to fill in the rest of the pattern. I now have a framework of the pattern to work with.
At this point now I can see how the segments will interact with each other. I print this rudimentary pattern out.
* * *
With a sheet of tracing paper I can elaborate on the pattern. Being able to see how the segments will interact, I can now pull the coyote's tail through from one segment into the other, weaving it into the aspects of the design in the adjacent segment, and also fill in the dead spaces (like that upper left triangular segment you can see in this sketch on the right). I can also fill in some filler knotwork patterns as well inside the bear, coyote, and surrounding areas. This is where basic understanding of knotwork design comes in. I don't bother with the grids and dots and things explicitly any longer, but it's there in my head still, and helps when laying this type of stuff out.
 Scanning Again
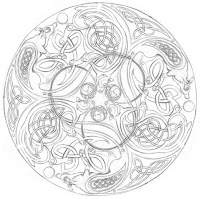
I scan in the results of that refined sketch, and once again (copy, paste, rotate 120 degrees) x 2 to see how the full design will look, and to make sure that all the adjacent segments line up properly.
There's a little awkwardness with the coyote's tail not lining up properly as it crosses over into the next segment, and the triangle overlaps the coyote's back too much, but those can be fixed in the next round. This gets printed out once again.
 Final Tweaking
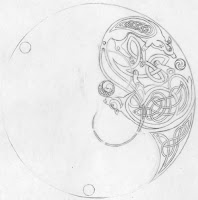
Once more, I lay a sheet of tracing paper over the print, and sketch out one entire segment. This will be the sheet I use for transferring to the final painting surface, and so I sketch out the whole circle, as well as the small spiral patterns at each third to use for lining things up, because the next part happens without any more digital aid. No more quick "rotate 120 degrees" with the click of a button!
Once this is done I go through my usual sketch-to-illustrationboard transfer method. I lay the sketch face down on the final painting surface, and tape it securely. I then burnish the back side of the sheet (fingernail works fine for this), and it transfers the lead from the tracing paper to the illustration board. I rotate the sketch 120, lining up the circles, tape it once again, and repeat.
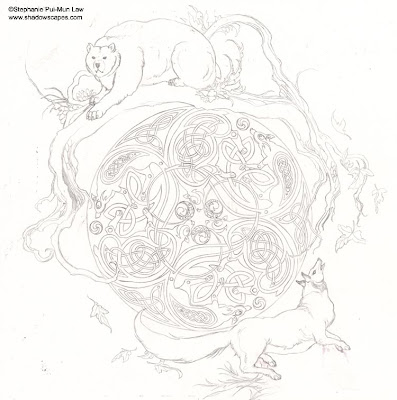
After all that sketching and re-sketching, here's the final result, ready to be painted.
* * *
 Scanning Again
I scan in the results of that refined sketch, and once again (copy, paste, rotate 120 degrees) x 2 to see how the full design will look, and to make sure that all the adjacent segments line up properly.
There's a little awkwardness with the coyote's tail not lining up properly as it crosses over into the next segment, and the triangle overlaps the coyote's back too much, but those can be fixed in the next round. This gets printed out once again.
* * *
 Final Tweaking
Once more, I lay a sheet of tracing paper over the print, and sketch out one entire segment. This will be the sheet I use for transferring to the final painting surface, and so I sketch out the whole circle, as well as the small spiral patterns at each third to use for lining things up, because the next part happens without any more digital aid. No more quick "rotate 120 degrees" with the click of a button!
Once this is done I go through my usual sketch-to-illustrationboard transfer method. I lay the sketch face down on the final painting surface, and tape it securely. I then burnish the back side of the sheet (fingernail works fine for this), and it transfers the lead from the tracing paper to the illustration board. I rotate the sketch 120, lining up the circles, tape it once again, and repeat.
* * *
The End ResultAfter all that sketching and re-sketching, here's the final result, ready to be painted.


That was an awesome & informative post... thank you for detailing your process! I've always been interested in how differently each artist chooses to work, to get from a blank sheet and an idea to a final product. :)
ReplyDeleteYou're welcome Jennifer! I'm glad you found this useful.
ReplyDeleteI just requested that book from my library - I've always done my knots kind of flying by the seat of my pants, but I'd love to be able to pull off something as complex as your designs one day. Can I ask what program you use for the digital portion of the work?
ReplyDeletePhotoshop
ReplyDeleteThank you for posting this! The end result is fantastic. It's really great to see the process of how a project is begun and executed. Celtic knotwork has always amazed me (it's one of those things I can stare at and get lost in), but this has helped shed a little light on that. It looks like a lot of fun! :)
ReplyDeleteIt is fun Christina. Takes a bit of patience, but it's worth it. :)
ReplyDeleteWow. I'm glad you made this post! :) I sit and look at your art and just ponder how did you do that! Glad to know you use photoshop too :P
ReplyDeletethank you, thank you for posting this. I am in the process of working on a knotwork design for a commission & have found it quite daunting to start. I shall have to look this book out. i do love your work, am always fascinated by celtic design *ruthie
ReplyDeleteBrave to take a commission for it without having done it before! Good luck, and I hope you find the book helpful Ruthie.
ReplyDeletei love your work .. you are my inspiration , my mentor, my idol... thankyou so much for all those information you have on your website,blogs and facebook, I really want to work like you .. and all your work is magic to one's imagination :)
ReplyDeleteYou're welcome! It's a pleasure!
ReplyDeleteI have used the book by George Bain you mentioned, and simply put, it is the best book to learn celtic knotwork from. Though he maybe precise and his methods maybe very structured, the results using his methods are (as above) spectacular. Beautiful piece of art and knotwork
ReplyDeleteThank you for this amazing tutorial, I learned a lot from it. You wrote clearly about every stage of your work, it helps a lot, thanks!
ReplyDeleteYou're welcome!
ReplyDelete