Wednesday, November 25, 2009

Sword Dancer

I've been silent for a bit, but still here. Just been a bit preoccupied with what the stork brought in last week. A little bundle named Claire Miranda Dawes. Sleep deprived. Managing to squeeze a bit of artwork in here and there though. Enjoying the chance to do more ink work.

Another couple of commissions:

Sword Dancer
Size: 9x11 inches
Medium: Ink on Bristol Board


And a piece for Kobold Quarterly magazine. Working on a cover for them as well, I think for the same issue this ink interior piece will be in.
The Ambassador
Size:7x9 inches
Medium: Ink on Bristol Board
Original available on etsy

Saturday, November 14, 2009

On Hopeful Wings

On Hopeful Wings
Size: 8x12 inches
Medium: Ink

Another commission piece, with a nice open theme, and a chance to do more ink work. Irises in the foreground. In the Victorian language of flowers: Hope, Faith, Wisdom, and Valor.

Also the woman, if you've followed previous entries, might be familiar as the original figure I had for the Aries sketch before the art director asked me to make that a male figure instead. She's found her place in this drawing though. No sketch idea ever goes wasted!

Wednesday, November 11, 2009

Under the Hill

Under the Hill
Size: 7x11 inches
Medium: Ink


There's a strange aspect to Sausal Creek:

At a glance it's a tangle of wild vines, old oaks, and giant pines. I walk along the path at the top of the ravine that cuts from my house to be swallowed by the green. And then suddenly in the middle of the path is a manhole cover. Incongruous, like it was dropped there in the dirt. A prop. But no, you can hear the rush of water far down below that dark iron circle. The sound is as real as the louder rush that trickles along the open stream at the base of the ravine.

It's an overlay of the man-made and the wild, a weird juxtaposition; like a lamppost in the middle of the frozen forests of Narnia. Instead of being a reminder of the streetlamps and roads I step off of when I set foot on this path, the manhole cover seems instead to be a marker, a footprint to follow down into the dense woods. As if to say, "Someone else was once here." And now there is just a dirt path slowly obscuring the evidence. Keep walking along the path and perhaps I too will be swallowed into the green.

Crouch down over that dark hole in the path. What lies beneath this hill?

Tuesday, November 10, 2009

Designing Knotwork - Spirals

Another element of celtic knotwork designs are spirals. Here's a quick tutorial of how to work with them. Having a compass and ruler are extremely useful for this type of work, though it is possible to eyeball it as well.


Two Coils
2-1
Start with a circle. Bisect the circle through the middle, and mark off segments of equal length outwards from the middle of the circle. Both the bisecting line and these marks are used for guides, so don't make them too dark.

2-2
After you have the guides set up, start the spirals from the center of the circle with twin arcs moving in the same direction, to the first pair of your markers. Pick clockwise or counterclockwise -- it doesn't matter which, as long as you are consistent.

2-3
From here, it's a matter of just continuing the arcs expanding outwards, always bringing each arm around to the next pair of markers.

2-4
And continue until you reach the outside of the circle. A simpler two-coil spiral can be made with fewer segments spaced farther apart, and a more elaborate one with more segments closer together.

* * *

Three Coils
3-1
Start with a circle. Mark off some guidelines by dividing the circle into thirds (either by using a compass or protractor to measure the 120 degrees). Mark off segments of equal length outwards from the middle of the circle along each of these three guidelines. These marks are used for guides, so don't make them too dark.

3-2
After you have the guides set up, start the spirals from the center of the circle with three arcs moving in the same direction, to the first set of your markers. Pick clockwise or counterclockwise -- it doesn't matter which, as long as you are consistent.

3-3
From here, it's a matter of just continuing the arcs expanding outwards, always bringing each arm around to the next set of markers.

3-4
And continue until you reach the outside of the circle.

* * *


Working Multiple Spirals Together
Okay, so those are the basics for a single spiral. You could apply the same technique to creating a spiral with as many arms as you want, just subdivide the circle with the number of guidelines equaling the number of coils you want the finished spiral to have. But how do you go about weaving those basic patterns into a more elaborate design?
4-1
Start with laying out some guidelines/circles for yourself. In this particular design, I want to have three interlocking spirals combined in a single circle. Visualize the final underlying structure, and with that in mind, lay out the guides that you need. This may take a bit of practice to be able to conceptualize beforehand and know what you need, but one thing you can do is start with what you think you need, and as you go, sketch in more guides as required.

4-2.a
The initial framework is in place, but each of the inner circles is to be a spiral, and so these must have their own guidelines and markers in place.

4-2.b
Start the arms of the spiral as previously described in the Three-Coil section above.

4-2.c
Finish up the three coiled spiral, and repeat on each of the three circles in this design.

4-3
After finishing 4-2, you would have a large circle, with three smaller circles contained in it, each with a separate three-coiled spiral. Now you can get creative about how to link these three elements together into a cohesive design. The most natural junction of these three spirals is for the lines to lead directly into a central three-coiled spiral in the middle of the design.

4-4.a
Now the three spirals are all linked together, but the design still has a lot of empty space, and the larger coils could use some tweaking and details as well.

4-4.b
In a large enough piece, you could even insert panels of simple knotwork inside the arms of the coils.

4-4.c
Or fill the surrounding space with a bit of knotwork.

4-5
Repeat whatever motifs you choose to implement around the entire design, and erase the guidelines to have your finished creation!

* * *

Examples from my current project
I'm currently working on designing a stained glass hanging lampshade for my room. Here are some practical examples of the design process I go through myself.

Saturday, November 7, 2009

Coyote & Bear Knot

Size: 12x12 inches
Medium: Watercolors & Colored Ink
*Designing the Knotwork*

Another commission piece. Haven't done extensive knotwork like this in a while, so it was a fun change. As I was working on this I found in my Hulu queue a National Geographic movie about Yellowstone Park, particularly about coyotes (with plenty of bears in it too)! It was quite apropos for getting inspiration.

Thursday, November 5, 2009

Designing Knotwork

Knotwork design can be very daunting. Someone was just telling me today that when she asked an artist at Dragoncon who utilized a lot of knotwork in his portfolio how to get started, his response amounted to, "you just feel it."

Unhelpful as that sounds, it does eventually come to that. But having some basic understanding of how to construct a very simple design, and the underlying patterns to create the weave are a necessary starting point. With enough practice from there, you do just start to feel it, and it becomes less of a technical nightmare.

Artist Cari Buziak has several free tutorials to get you started on knotwork, and the book that I learned from and found to be the most helpful was Celtic Art: the Methods of Construction, by George Bain.

However, the method of instruction he uses is very compact and concise, and might be confusing to some people, though it worked quite well for me. He does cover all types of designs, including knotwork, spirals, key patterns, and anthropomorphics.


* * *

Initial Concept

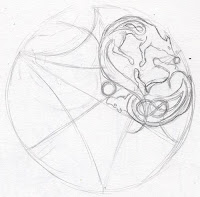
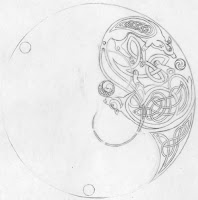
This particular commission was for a circular knotwork piece incorporating coyote(s) and bear(s), so I start with sketching out some guidelines. The circle itself, as well as separating it off into segments.

With the two animals to work in, I can either choose to create a non-symmetrical design, or else portion off the circle and create a repeating pattern. I chose to the do the latter for this, and divided the circle up into thirds (with a subdivide in each segment so that half is the coyote, half is the bear).

I then can roughly sketch in how the animals will fit into the design. You can see how I pull the coyote's tail down into the adjacent segment -- eventually it goes much further than that even, but this helps to tie the whole design together so that it's not just 3 big pie slices in their separate containers, but a melded whole.

* * *

Scanning and Propigating the Pattern

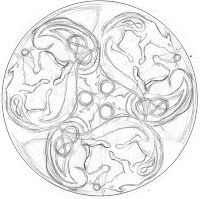
Here's where the joys of the digital age kick in. Once I have the basic structure in mind for one segment of the pie, I scan it in.

Digitally, I take that segment and rotate it 120 degrees to fill in the rest of the pattern. I now have a framework of the pattern to work with.

At this point now I can see how the segments will interact with each other. I print this rudimentary pattern out.

* * *

Elaborating on the Basic Pattern

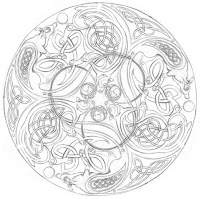
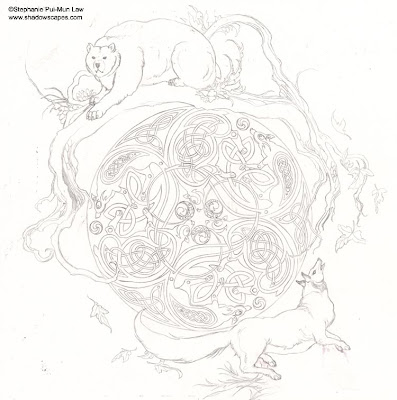
With a sheet of tracing paper I can elaborate on the pattern. Being able to see how the segments will interact, I can now pull the coyote's tail through from one segment into the other, weaving it into the aspects of the design in the adjacent segment, and also fill in the dead spaces (like that upper left triangular segment you can see in this sketch on the right). I can also fill in some filler knotwork patterns as well inside the bear, coyote, and surrounding areas. This is where basic understanding of knotwork design comes in. I don't bother with the grids and dots and things explicitly any longer, but it's there in my head still, and helps when laying this type of stuff out.

* * *

Scanning Again

I scan in the results of that refined sketch, and once again (copy, paste, rotate 120 degrees) x 2 to see how the full design will look, and to make sure that all the adjacent segments line up properly.

There's a little awkwardness with the coyote's tail not lining up properly as it crosses over into the next segment, and the triangle overlaps the coyote's back too much, but those can be fixed in the next round. This gets printed out once again.

* * *

Final Tweaking

Once more, I lay a sheet of tracing paper over the print, and sketch out one entire segment. This will be the sheet I use for transferring to the final painting surface, and so I sketch out the whole circle, as well as the small spiral patterns at each third to use for lining things up, because the next part happens without any more digital aid. No more quick "rotate 120 degrees" with the click of a button!

Once this is done I go through my usual sketch-to-illustrationboard transfer method. I lay the sketch face down on the final painting surface, and tape it securely. I then burnish the back side of the sheet (fingernail works fine for this), and it transfers the lead from the tracing paper to the illustration board. I rotate the sketch 120, lining up the circles, tape it once again, and repeat.

* * *

The End Result

After all that sketching and re-sketching, here's the final result, ready to be painted.


Dark Phoenix

Dark Phoenix
Medium: Watercolor
Size: 11x18 inches

A proliferation of wings in these recent pieces. One more winged piece to come, after I finish the knotwork commission. This piece btw a commission as well, and a pleasure to work on. I've been painting up a storm lately, getting as much work done as I can in anticipation that dedicated painting time might be an uncertain thing and in short supply in a few weeks. The new member of the household is due to be born pretty much at any time now. We're eagerly awaiting her arrival!

Monday, November 2, 2009